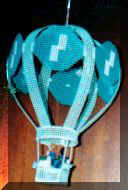
Instructions for Hot Air Balloons
If you'd like, you can make these balloons yourself. Choose your two favorite colors. Maybe the colors of your favorite football, baseball, hockey, basketball team. Choose the two colors that will compliment your bedroom or colors you'd like to have outdoors. You will also need some yarn either in a complimentary, contrasting or matching color. You will also need a large needle with a large "eye" for the yarn to be threaded through. These needles are usually blunt on the end, not sharp.
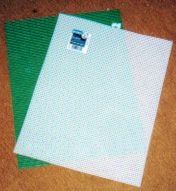
Most craft stores sell plastic canvas in sheets as shown below. Each sheet is 10-1/2" x 13-1/2". They cost about 50¢ each depending on where you go and at what time of year.
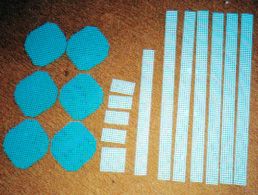
Cut your sheets as follows: The strips and rectangles shown below are all the same color. The egg shapes are in the second color you've chosen. You will be doing a lot of counting of tiny squares/holes here to get the exact measurements. I've also included the actual inches involved, but when in doubt, it is better to make sure you have the exact amount of "holes" I have indicated. You want everything to match and "hole" counting is the best way to do that I think.
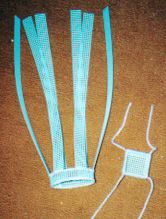
For the long sides of the balloon you will need six long strips: The longest strips are 13-1/2" x 3/4" or (90 squares/holes x 5 squares/holes), so start at the bottom of the long sheet of plastic canvas and count over 5 squares. Make sure that you have 5 squares solid in each strip. Then cut on the outside of the 5th square all the way up the 13-1/2"length of canvas. You will notice after cutting that each strip has leftover plastic sticking out along the edge. Over a wastebasket, cut these off so each side of the strip is smooth.
For the base of the balloon you will cut one more strip of 5 squares/holes x 65 squares/holes (3/4" x 9-3/4") long. Again, you will cut off the rough little pieces sticking out along the edge.
For the bottom of the basket you will cut one square 12 holes x 12 holes (1-7/8" x 1-7/8"). For the sides you will cut four pieces 12 holes x 7 holes (1-7/8" x 1-1/8")
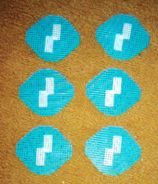
For the "egg" shapes you will need to cut squares that have 21 squares/holes in each direction. These squares will measure 3-2/8" x 3-2/8". You will cut off parts of the square on all 4 corners but you need to leave the width exactly 21 squares/holes (3-2/8") because you will leave 5 holes right in the middle of the sides of the square. These shapes will be attached to the six long strips you made first.
For the lt. blue design in the middle of the "egg" shapes, you can be creative and use your imagination. You could cut heart shapes or diagonals - whatever you think will look good as a design. Using the leftover canvas from your "strips", make a design and make 6 of them. This can be a square of 1" x 1" or whatever you can think up. I'm leaving it up to you. J
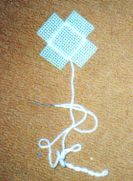
When you are done cutting, your pieces should look like the picture below. I didn't include a picture of the little lt. blue design because you can see what I used in the finished picture at the top of this page and on the previous page.
Now we are ready to start "sewing". The first picture below shows the basket being assembled. You will thread your needle with the yarn you've chosen and just weave it through one side of the bottom piece to one long edge of a side piece. When you get to the end, attach another side piece and keep going until it looks like the picture below. Now you can fold up two sides of the basket and weave them together. When you are near a point where you need to cut the thread to start the other side, push the needle back through your weaving to hide it and then cut the end very close to your work so it doesn't show. You can see the finished basket in the second picture below. For the long strings just attach your yarn to each corner, tie it and cut it at about 6" so you will have room to work with it when you tie it to the balloon. You can also use your yarn to edge the top of the basket to give it a little more firmness and a more finished look.
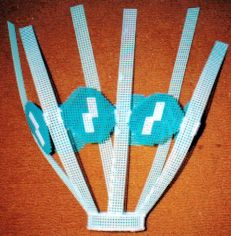
Now take the shortest strip that is 9-3/4" and form it into a circle and overlap about 3 squares on each end. Weave these together neatly and weave back through the edge again for added strength and a finished look. Do the same along the top edge BUT as you are doing this, attach one of the long strips (13-1/2") into it. When you have finished with one strip continue weaving the circle about 6 more squares and then attach another long strip and weave it in. Continue all the way around until you have attached all six strips. Remember to weave your thread back through an inch or so to hide it before you cut it off. Your finished piece should look like the first piece in the second picture below.
Now you are ready to put your "design" on the "egg" shapes as shown below. You can simply thread your yarn through the "design" a few times to attach it to the "egg" and tie it off in the back. See the third picture below.
Now we really start counting "squares/holes". From the base, count up one of the long strips to the 38th hole. Take one of your "eggs" and attach the 5 hole side to that 38th hole and weave your way UP through the 5 holes. Work your thread back through and cut off. Continue all the way around and be sure you always start at the exact same hole, otherwise your balloon will be crooked.
If you prefer to make a different design instead of an "egg" shape, you can. Just keep in mind that the "width" of the shape must be 21 holes wide and you need the 5 holes to attach it to the longer strips.
Hey, we are almost through! Now we have to attach all of the six long strips together to round out our balloon. Take one of the long strips and count from the top edge DOWN to the 24th hole. Lay this over the long strip that is directly across from it and count down to its 24th hole. Attach both ends by again weaving your thread through both strips. You might wonder why we don't just cut off the excess of each strip and weave them together; but it won't work. We need the excess of these 24 holes to give the top strength so it will HOLD it's shape. Now, do the same with the remaining four strips, working in twos to get the end result shown in the second picture below. Now we have a hot air balloon! Hurray! All we have to do now is thread the yarn through the middle of the top, starting from the INSIDE of the balloon and leave about 12" of yarn out the top and then thread back through to the INSIDE and tie a knot so we can hang our balloon anywhere.
Did I forget the basket? Nope! Attach the basket to the balloon by tying the 6" yarn making sure to center the yarn so the basket will hang straight. Tie a knot and you are done. Well, almost. What will you put in your basket? A little passenger? Flowers? Put whatever you want in your basket. Just remember not to put something too heavy in it. Lightweight is the rule. I put little flowers in mine and a little bear as a passenger. I use my hot glue gun to attach them to a coke bottle cap (this raises them up a little so you can see them) so they won't fall out. I wouldn't want any little bear hurting himself. J

Well, that's about it. Now, all that is left to do is show off your balloon. Enjoy!
If you need any help, just email me. (My email addy is near the bottom of my homepage.) I'd love to hear what you did with your hot air balloon.
This background came from Cats and Kittens. See my homepage for the URL.
Unless otherwise
noted, Copyrights (c) are retained by S & B Crafts on all existing art,
images and graphics located in this site. All Rights Reserved.
This site originated on December 30,
1999